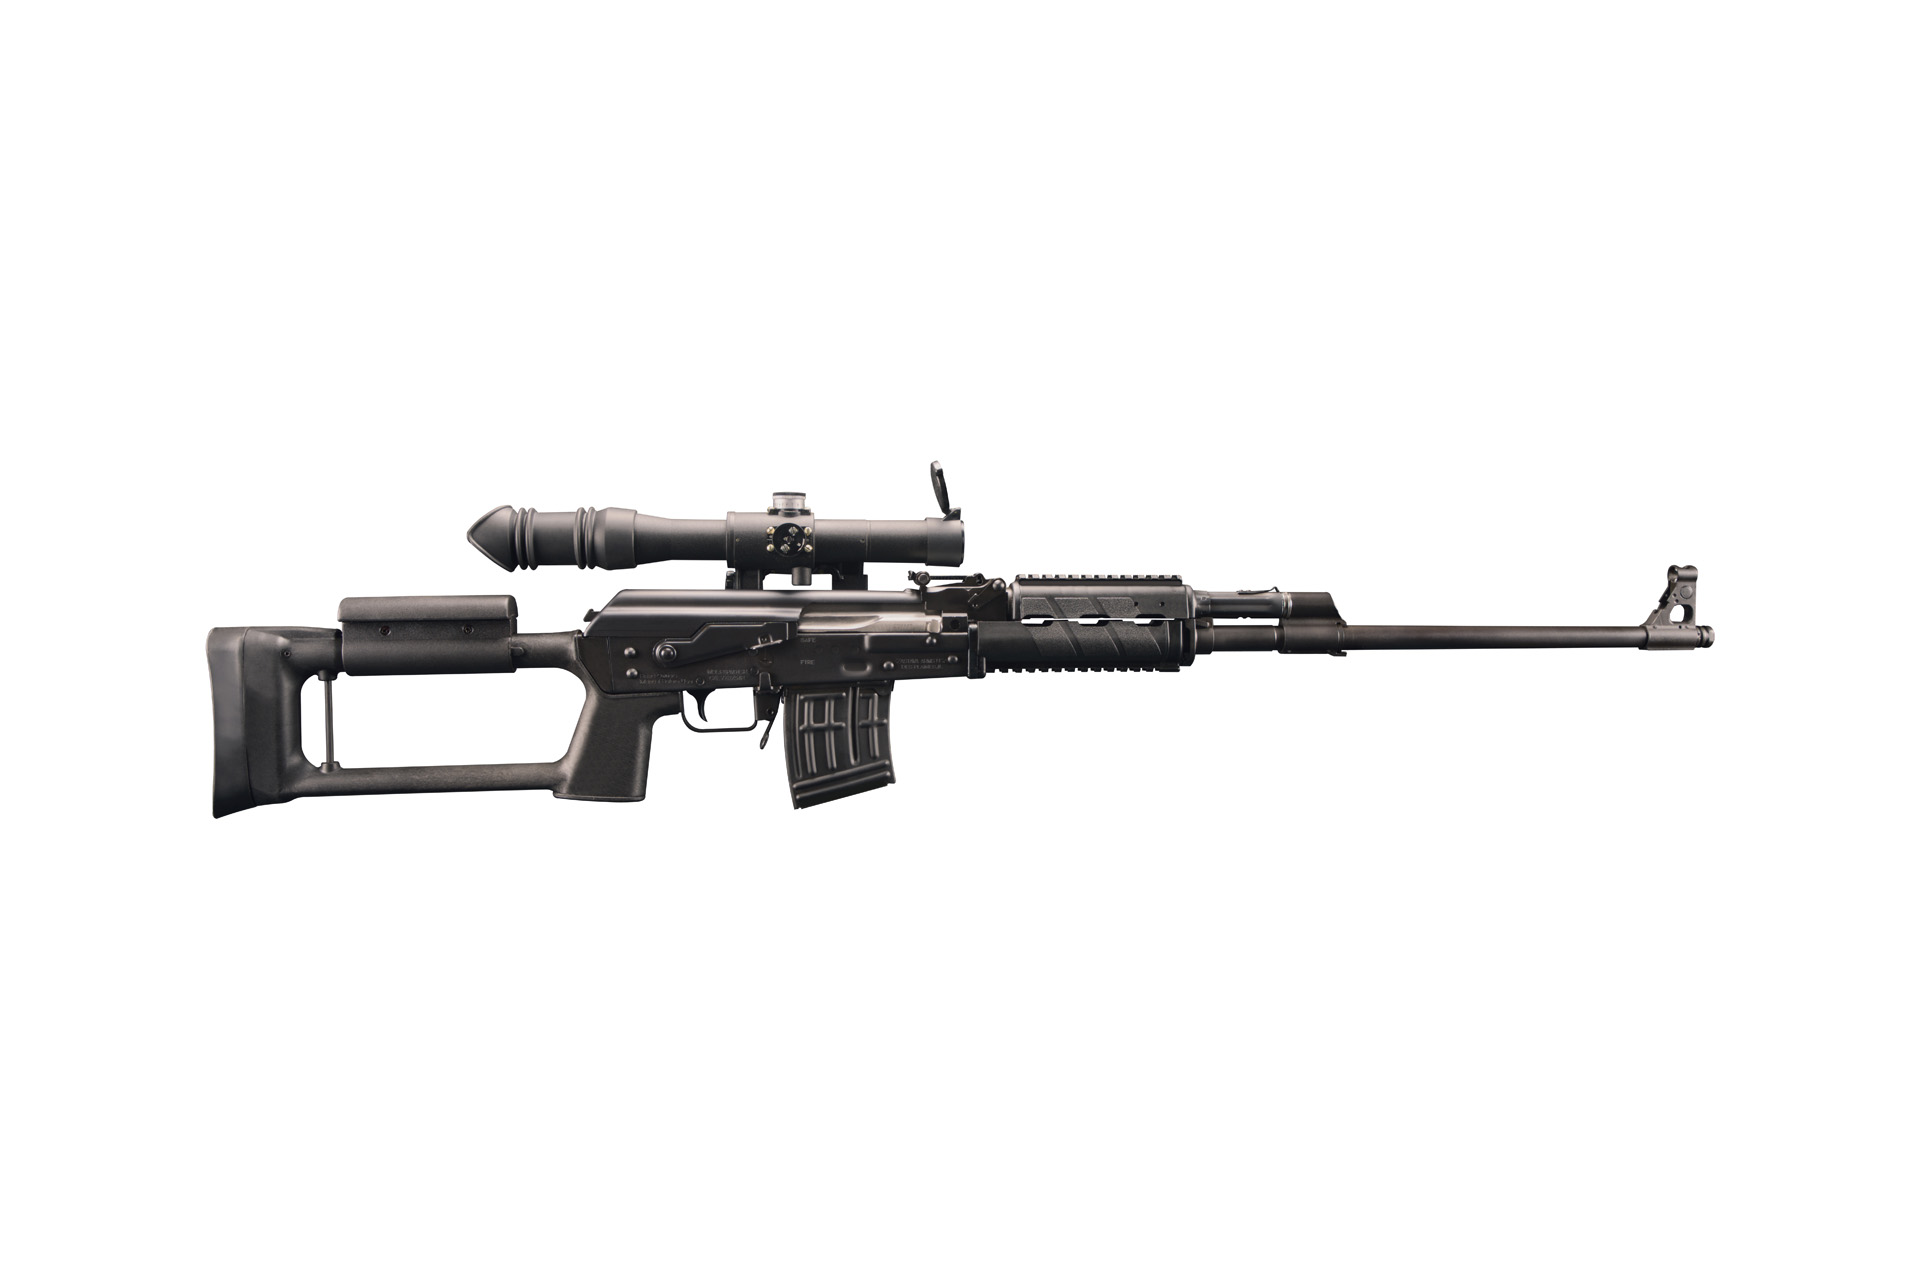
So, you’ve picked up the legendary Zastava M91 and paired it with the ruggedly reliable M91 POSP Scope. Nice choice—you clearly know your gear. But now comes the important part: actually getting that scope mounted and dialed in so you’re not just looking cool, but also shooting cool.
Let’s walk through the whole process—mounting, zeroing, and getting that optic singing in harmony with your rifle like a Balkan choir.
What Makes the M91 POSP Scope So Special?
Before we get all hands-on, let’s take a second to appreciate what you’re working with.
The M91 POSP 4×24 Rifle Scope is the classic Soviet-inspired optic tailored specifically for the Zastava M91 Sniper Rifle. It comes with a 4x fixed magnification, a built-in rangefinder reticle, and an illuminated reticle powered by a simple battery setup.
In short, it’s simple, sturdy, and designed to survive abuse—and still hold zero. Kind of like your grandpa’s toolbox, but with better glass.
Step 1: Unboxing and Inspecting the POSP Scope
When you unbox the POSP scope, double-check for:
- The scope itself (obviously)
- Scope mount (usually pre-attached)
- Lens caps (treat them like gold)
- Battery compartment and included battery (CR1/3N or equivalent)
- Adjustment dials (you’ll be intimate with these soon)
- Instruction manual, possibly in Cyrillic (a fun decoding challenge)
If anything’s missing, stop here and contact the seller. No point in mounting half a setup—unless you’re practicing for disappointment.
Step 2: Understanding the Side-Mount Rail on the M91
The M91, true to its heritage, uses the side-mount rail. If you’re coming from an AR-style platform, this might feel like stepping into another dimension. But trust the process. Side rails work like a charm once you get the hang of them—and they keep your optics rock-solid.
The side rail sits on the left side of the receiver. It allows for quick-detach optics like the POSP, and if properly installed, it returns to zero every time. (Unless you really abuse it—don’t do that.)
Step 3: Mounting the M91 POSP Scope
Time to get hands-on. Follow these steps to secure the scope:
1. Unlock the Mounting Lever
On the side of the POSP mount, you’ll find a throw lever. Flip it to the open position. It should rotate outward smoothly.
2. Slide the Scope onto the Side Rail
Align the mount with the rail. Slide the scope forward until it locks into position. You might feel some resistance—just don’t force it like you’re tightening lug nuts. Gentle but firm wins the race.
3. Engage the Lever
Flip the throw lever back to the locked position. If it’s too tight or too loose, adjust the tension screw beneath the mount. Ideally, the lever should close snugly with a bit of resistance—not require Hulk strength or a rubber mallet.
4. Check Alignment
Look down the rifle from the rear. The scope should sit centered and level. If it leans like the Tower of Pisa, loosen and try again. A crooked scope ruins everything—like putting ketchup on cevapi.
Step 4: Inserting the Battery and Testing Illumination
The reticle in the M91 POSP scope lights up with a red glow. This isn’t just for show—it helps in low-light conditions when black crosshairs on a dark target are about as useful as a sunroof on a submarine.
Unscrew the battery compartment cap, drop in the battery (positive side up), and turn the illumination dial. You’ll hear a click and see the reticle light up if everything works. If not, double-check battery polarity or swap it out.
Step 5: Understanding the Reticle and Rangefinder
This part’s fun. The POSP scope has a built-in stadiametric rangefinder. It’s designed to estimate distances based on the average height of a human (around 1.7 meters). You line up the person between the horizontal line and the curved arc. The number above shows the estimated range in hundreds of meters.
There’s also a bullet drop compensator (BDC) built into the elevation turret, calibrated for the 7.62x54R cartridge fired by the M91. The numbers on the dial (1 to 10) correspond to 100-meter increments—so 3 = 300m, 5 = 500m, and so on.
Simple, Soviet, effective.
Step 6: Zeroing the M91 POSP Scope
Now that you’ve mounted your scope, it’s time to zero it. Here’s how:
1. Start at 100 Meters
Set up a solid bench rest and paper target at 100 meters. Make sure your rifle is stable—no wobbly tables or collapsing bipods.
2. Fire a 3-Round Group
Shoot a tight group aiming dead center. Don’t adjust after each shot—wait and see where the group lands.
3. Measure Point of Impact (POI)
Determine how far off the group is from your point of aim (POA). Use your scope’s adjustment dials to move POI to match POA.
- Each click on the POSP equals 1 cm at 100 meters.
- Elevation is on top; windage is on the side.
4. Adjust Windage and Elevation
Turn the dials in the direction indicated. Example: If your shots land low and left, crank the elevation up and windage right.
Pro tip: Make small adjustments. Overcorrecting can lead to a frustrating game of scope-ping-pong.
5. Repeat Until Zeroed
Fire another 3-round group. Adjust again if needed. Once you’re consistently hitting center, congrats—you’ve zeroed your POSP.
Step 7: Confirming Zero at Distance
After mastering the 100-meter zero, you can test the BDC settings by engaging targets at 300, 500, and even 800 meters. Rotate the elevation drum accordingly and see where your shots land.
If your BDC matches your ammo and environmental conditions, you should stay on target. If not, you may need to learn your own DOPE (data on previous engagements) and make manual corrections.
Or just write “aim slightly high” on your stock with a Sharpie. No judgment here.
Pro Tips and Common Mistakes
- Always recheck mount tightness after range trips.
- Avoid over-tightening the mount lever—it should lock firmly, not strip metal.
- Practice ranging with the reticle before you rely on it in the field.
- Don’t forget the eye relief—the POSP has a generous 80–100mm. Too close and you’ll earn a scope kiss.
- Use quality ammo for consistent groups. Cheap surplus rounds often bring chaos.
Wrapping It All Up
The M91 POSP Scope was built for rugged reliability and battlefield precision. When mounted and zeroed correctly on your Zastava M91, it becomes more than just an accessory—it’s your eyes in the field, your rangefinder, and your secret to long-range domination.
Want to get your hands on the full setup? Check out the Zastava M91 Sniper Rifle and grab the M91 POSP Scope while you’re at it.
And for all things Zastava, scopes, parts, or just pure Serbian firepower goodness, visit the Zastava Arms USA homepage—your one-stop shop for serious shooters.
Now go out there and zero that beauty like a legend. Just… don’t forget to take your lens caps off first.